We’re gearing up for our ward’s Young Women in Excellence and I thought I’d share with you what we’re doing and some coordinating printables I’ve created. Our theme this year is “Whooo is ready to stand for truth and righteousness?” and we’re using owls to tie it all together. Our fabulous YW President, Shauna, got the idea from a friend and we’re giving it our own spin. This idea and my printables are easily adaptable to New Beginnings, Girls Camp and other Young Women activities as well as for Activity Days recognition events. Continue reading “Young Women in Excellence: Whooo Is Ready to Stand for Truth and Righteousness?”
Category: Young Women in Excellence
2013 Mutual Theme Key Logos and Theme Ideas
Today I have some key graphics featuring my 2013 Mutual Theme logos for you. Use this clip art on posters, programs, invitations, binder covers, handouts, t-shirts and more. (I have some posters with the key logos coming soon.)
Continue reading “2013 Mutual Theme Key Logos and Theme Ideas”
2013 Mutual Theme Chalkboard Posters in Six Sizes
As promised, I’ve got posters for you! I used my 2013 Mutual Theme logos to create a chalkboard-style poster in 18×24, 16×20 and 11×14-inch sizes for you to use for youth conferences, New Beginnings, Young Women in Excellence, firesides and to hang in your classrooms. Plus, I’ve included 4×6, 5×7 and 8×10-inch sizes so you can have them printed as handouts or gifts for your youth, leaders, parents or to use as binder covers. All in all, this poster set includes 18×24, 16×20, 11×14, 8×10, 5×7 and 4×6-inch high-quality jpeg files ready to upload to your favorite photo printer. (I usually go with Costco.com for printing my posters, but there are several fantastic printers out there.) (NOTE: My watermark is not on the download posters.) Continue reading “2013 Mutual Theme Chalkboard Posters in Six Sizes”
2013 Mutual Theme Logos: Stand Ye in Holy Places
I’m so excited to present to you my 2013 Mutual Theme logos!
When I read this year’s theme, I wanted to create something graphic with references to the temple. Taking inspiration from all the chalkboard art I’ve seen popping up everywhere, I designed my logos with bold lines and interesting fonts. Use these logos for mutual newsletters, t-shirts, posters, invitations, flyers, handouts and more–anything requiring a logo! Continue reading “2013 Mutual Theme Logos: Stand Ye in Holy Places”
Young Women’s Values Fabric & Chandelier Damask Fabric: Now Available
I’ve added some new fabric prints to my Spoonflower shop! Now, you can order these fabrics for your Young Women projects. Use them to make gifts for your young women or YW leaders, quilts, pillowcases, pajamas, scripture totes, aprons, tote bags, purses, tablecloths and more! Continue reading “Young Women’s Values Fabric & Chandelier Damask Fabric: Now Available”
As Bright As Your Faith Tags
Our wonderful Young Women’s President, Shauna, and our fabulous YW Secretary, Ashley, asked me to help them create some gifts for the Laurels in our ward who are graduating from high school. Shauna and Ashley put together some adorable candy-filled light bulb candy jars from Hobby Lobby and wanted to attach tags with the following quote from Presiden Thomas S. Monson:
Your future is as bright as your faith.
I created some two-by-four-inch tags with the quotation in subway-art style with a bright yellow gradated background. I think they came out great and work perfectly with Shauna and Ashley’s gift. Continue reading “As Bright As Your Faith Tags”
2102 Mutual Theme CD/DVD Folders and Jewel Case Inserts
A wonderful reader of this blog requested something with my 2012 Mutual Theme logo that she could use with a CD of special music she wanted to give to the Young Women in her Stake. I made two options for her. Use either one to add a special touch to a music CD for a YW birthday gift, lesson handout or Young Women in Excellence favor. Or, use them with a YW year-in-review or Girls Camp DVD!
Continue reading “2102 Mutual Theme CD/DVD Folders and Jewel Case Inserts”
Photoshop/Photoshop Elements Tutorial: Customizing Photo Invitations with Text
I’ve had some questions about how to customize and add information to my photo invitations. To help you, I’ve written this tutorial that shows you how easy this can be! You will need to have Photoshop or Photoshop Elements to follow this tutorial, but you may also be able to adapt the steps to other software programs. I’m going to use one of my Free Gift photo cards in this tutorial. If you want to receive this card plus four others, Like Hang a Ribbon on the Moon on Facebook or Follow this blog by email (see right-hand sidebar). Facebook followers can find the download link by clicking on the Welcome tab on the Facebook page. Blog Followers will receive the link to the download via email within 48 hours of following.
Ready? Now, let’s get started!
- Start Photoshop or Photoshop Elements.
- Click on File>Open and navigate to the invite .jpeg you want to add text to. I’m going to use the temple 5×7 invite to create a Young Women in Excellence invitation. Select the file you want and click Open.
- Now it’s time to start adding your text. Click on the Type tool in the toolbar. The Type tool looks like a T.
- The Type Tool toolbar will appear at the top of the page, just under the Menu bar.
- To specify which font you would like to use, click on the first pull-down box on the left. This is where you will select your font by clicking on the small down arrow and then scrolling until you find your desired font. For this invitation, I’m going to be using two fonts: Chocolate Box and Tagettes. First, I select Chocolate Box from the pull-down. (Note: If you download these fonts, you will need to unzip the files and then install them before you can use them. You may need to restart Photoshop/PSE before the newly installed fonts appear in the pull-down.)

- Select the size you want your text to be in the Set Font Size box in the Type Toolbar. It looks like a big T and little T together. There are two ways to set your font size. You can click on the down arrow and select one of the sizes on the pull-down menu that appears OR you can click inside the box next to the number and enter a numeric value there. For this size of project, you should not need to enter your own number. Both the numbers and numerical values you enter refer to the point size of your type. I am going to select 36 from the pull-down for my first lines of text in my invitation.
- Now, move your cursor on the image roughly where you want text to appear. Click and type. It is a good idea to put each different line or phrase on a separate type layer. This way, you can move them around easily without having to re-type things. Don’t worry if your words don’t appear exactly where you want them to be–you will be able to move them around and rearrange them later.
- Enter all of your information. As you enter each line of text on your invitation, a new layer in your layers palette will appear. NOTE: if you want to put text on a black area of an invitation, be sure to change the color of your text to white (or another color) first by following the next step.
- To change the color of your text, select the Type tool and highlight the text to be colored by double-clicking on appropriate type layer in the Layers Palette.
- Then, click on the Select Text Color box that appears in the Type Tool toolbar.
- This brings up the Select Text Color box. Use the slider and reposition your cursor and click to change the color. When you are satisfied, click OK.
- Now it is time to arrange and finalize your text. To make changes to a specified layer of text such as size and font, double-click on that layer in the Layers palette. This will highlight the text to be edited.
- Make desired changes in the Type Tool toolbar and click the check mark (Commit Any Current Edits) to accept the changes. To reject the changes, simply click on the circle with a line through it (Cancel Any Current Edits).
- Move text layers around by using the Move tool. Double-click on the desired layer in the Layers Palette, click on the Move tool.
- Now, move your cursor to the bounding box that appears and click. Move your cursor inside the bounding box so it turns into an arrowhead and hold down the left mouse button while dragging the text layer to the desired position. Release the mouse button when you’re satisfied. Click the check mark to accept the move or the circle with the line to reject the move.
- Once you’re done editing and arranging your text, save your file. Select File>Save from the File menu at the top. Navigate to the desired location, RENAME your file and save. This saves your file as a .psd file, which keeps the layers intact. Open this file if you need to make changes later.
- Now, SAVE YOUR FILE AS A HIGH-QUALITY JPEG FILE for printing. Select File>Save As from the File menu. Make sure you select jpeg from the pull down menu next to File Type when the Save As box pops up.
- Type in your file name and navigate to where you want to save it and click save. A dialog box will pop up that lets you set your .jpeg quality. Drag the slider all the way to the right to the number 12–this will make sure you get the best print quality. Click OK and it will save. Upload the .jpeg to your photo-processing site or take it in to the store for printing.
Easy, right! If you don’t have Photoshop or Photoshop Elements but want to give these programs a try, Adobe offers free trials–simply download the free trial, install and get going!
And, to get your started, get your free gift from me by liking Hang a Ribbon on the Moon on Facebook or by Following this blog by email (see how in the right-hand sidebar). Find the download link by clicking Welcome on my FB page or get them by email within 48 hours of following this blog.
Thanks for visiting Hang a Ribbon on the Moon!
Arise and Shine Forth: Mini Pillows with Custom-Printed Fabric Fronts
I have been working on this project for quite some time and am sooo excited to finally share it with you! Last summer for Girls Camp, our leaders designed a fun project for the girls to do in their spare time: stuffing pillows! To prepare the pillows, we had our camp theme printed on some custom-designed fabric. Then a generous sister in the ward sewed the six-by-six-inch pillows, leaving an opening for stuffing. Up at camp, the girls got to stuff and sew closed their own special camp mini-pillow.
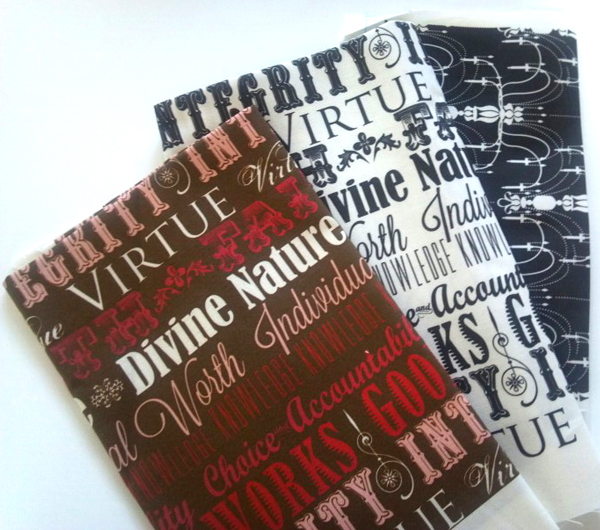
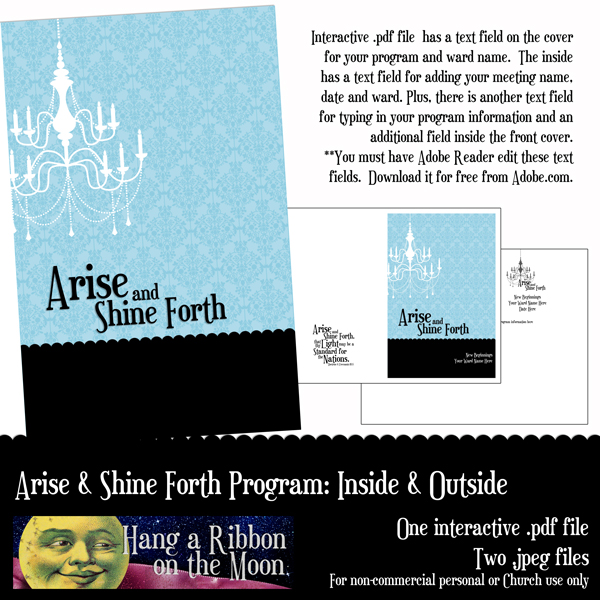
Inspired by how successful the pillows were for our girls, I designed custom-printed fabric pillow fronts featuring my Arise and Shine Forth 2012 Mutual Theme chandelier logo for you to use! You can easily order my design pre-printed on fabric from Spoonflower.com–no trying to print and iron on a design with less-than-stellar results!
Each eight-by-eight-inch pillow front features the chandelier and full scripture for the Mutual theme. You can select either striped or damask backgrounds.
When you order your fabric, you’ll notice I’ve added cutting lines right into the design, so you won’t need to measure at all–just cut on the lines. Better yet, layer the pillow-top fabric on top of purchased black cotton for the pillow backs and cut out both together! I’ve also allowed for a 1/2-inch seam allowance on each side of the pillow front.
Make these mini pillows for your girls to put on their beds to remind them to pray and “Arise and Shine Forth” in the morning!
Since each pillow front is eight-by-eight-inches square, and each yard of printed fabric is 42-by-36-inches, you get sixteen pillow fronts per yard. At a cost of $18 (US) per yard for the quilting cotton, that makes the cost for each pillow front $1.13 (US)! Add in the cost for black broadcloth/quilting cotton for the backs and poly fiberfill for the stuffing and you have a great gift or craft project for about $2 (US) per girl! You may also have ward members with extra fabric and stuffing they could donate so you don’t have to buy anything but the pillow fronts.
If you need just one pillow front, order a sample for $5 (US) plus $1 shipping and you will get one eight-by-eight-inch pillow front. Fat quarters are also available.
I have more Arise and Shine Forth fabric designs in the works at Spoonflower.com and will release them as soon as I’ve proofed the final prints. They are all-over prints with the chandelier logo or just chandeliers. These prints will work perfectly for pillow backs, or you could combine them with the pillow fronts to make quilts, tote bags, aprons or bandanas. You may want to frame a pillow front for a fast and easy gift. Girls could use my fabric designs to make gifts for Stake leaders, Bishops, camp Secret Sisters or as a Value Project.
To make my finished pillow, I used my custom-designed pillow front fabric and a piece of a black fabric remnant for the back plus about 1/4 a yard of inexpensive (about $1 (US) per yard) blue tulle for the ruffle around the edge. I also added some black beaded trim(about 3/4 of a yard) I got at the craft store. This quick project took me just over an hour to sew, stuff and sew closed.
Spoonflower.com prints on high-quality fabrics which are washable and colorfast, just like the printed fabrics in the store. Plus, at Spoonflower.com, you can order fabrics in several types: Kona cotton, quilting-weight cotton, cotton poplin, cotton voile, cotton silk, linen-cotton canvas, organic cotton interlock knit, organic cotton sateen, upholstery-weight cotton twill and silk crepe de chine. Check out this page here for more information on fabric options.
Here’s how to order my Arise and Shine Forth Mini Pillow Fronts fabric:
- Go to Spoonflower.com and search for “Arise and Shine Forth” in the search box OR
- Visit my Spoonflower.com shop OR
- Click here to go to the damask background pillow front fabric page OR
- Click here to go to the striped background pillow front fabric page
- Select the desired fabric you want the design printed on. I used quilting cotton ($18/yard–16 pillow fronts per yard)
- Calculate the yardage you will need and select the amount you need to order in the “sizes” area.
- Once you’re sure about your order, click “Add to Cart.”
- Complete your order.
Note: One test swatch will give you one pillow front.
If you have any questions about Spoonflower.com fabrics, shipping times and prices or ordering, check out their help page here. I’ve been impressed with their quality and customer service.
I am so excited to share this fun project with you! If you decide to make something using my pillow fronts, please be sure to share your project in the comments!
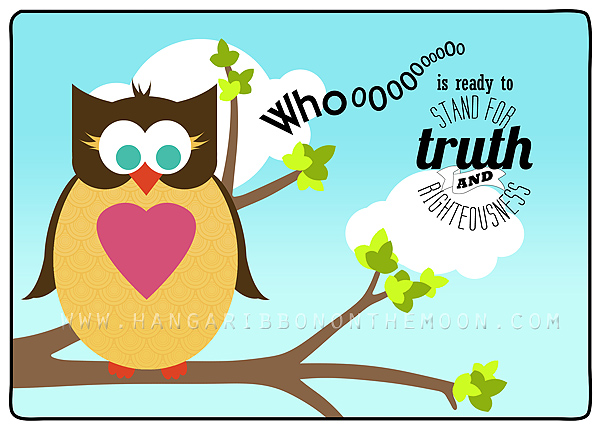
Arise and Shine Forth Program (Cover & Inside): Interactive .pdf for New Beginnings, Young Women in Excellence, etc.
Here’s another reader request: an Arise and Shine Forth program cover and inside for you! I’ve created for you an interactive .pdf document which means you can add all your program information right in Adobe Reader! And, all of your text will be in Euphorigenic, the font I’ve used for my logo.
Page one of the .pdf has a text field where you can enter the title of the meeting (New Beginnings, Young Women in Excellence, etc.) as well as your ward name. The back features the 2012 Mutual Theme scripture.

Page two of the .pdf (the inside of the program) has the chandelier logo as well as a text field where you can add the meeting title, your ward name and the date. The second field is ready for you to add your speakers, prayers and other program information. Finally, I’ve added a third field inside the front cover where you can add announcements, song words or anything else you want!

Once you’ve added your meeting details, print out page one. Then, re-insert the paper in your printer and print out page two. After you fold the printed programs, they’re ready to go! So easy!
If you don’t have the FREE Adobe Reader program, download it from Adobe.com. I’ve also included high-quality .jpeg files of the inside and outside, so you can totally customize the program to fit your needs.
I have some great new projects coming soon, so be sure to “like” Hang a Ribbon on the Moon on Facebook or become a follower of this blog.
Download my 2012 Arise and Shine Forth program .zip file here.
You will need to unzip it after downloading in order to use the files.
Remember, all of my files are for non-commercial, personal or Church use only!
DO NOT SHARE my files! Send your friends here to download their own copies!
Thanks so much for visiting Hang a Ribbon on the Moon.


