YW Manual 1 Lesson 23 Handout: The Process of Forgiveness

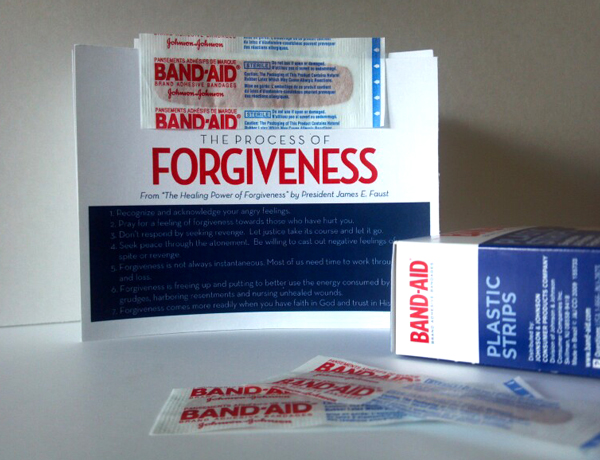
I’m teaching our Beehives this week and came up with this quick and easy handout to go with Young Women’s Manual 1, Lesson 23: Forgiveness. The handout  is based on this talk, The Healing Power of Forgiveness by President James E. Faust. Since the process of forgiveness relates so well to the healing of a physical wound, I came up with a 5 1/2-by-4 1/4-inch card designed in the style of a Band-Aid box of bandages. Simply print the cards (four to a page), cut them apart and glue a bandage to each one and you’re ready to give your girls a memorable take-home message from this lesson.

Continue reading “YW Manual 1 Lesson 23 Handout: The Process of Forgiveness”

Everyday Storyteller: An Inspiring Scrapbooking Idea Book

I was thrilled this week when the book I worked so hard on with Jennifer Wilson (of SimpleScrapper) and Lynnette Penacho came in the mail!

Everyday Storyteller is an inspiring scrapbooking (both paper and digital) idea book with articles and practical ideas from 33 of the industry’s best scrappers! From journaling and blogging to photography and adding visual interest to a layout, this book is packed with ideas to help you in every phase of memory keeping. And, not only is it available in digital .pdf format, but you can get your hands on a beautiful soft-cover print version as well! Continue reading “Everyday Storyteller: An Inspiring Scrapbooking Idea Book”

Father’s Day: You’re Tie-riffic! Tie Cards

Here is my second Father’s Day project for you: You’re Tie-riffic! cards.

They’re easy and great to do with your Young Women, Primary kids or Activity Days girls. I’ve got instructions and a download containing pattern pieces and “You’re Tie-riffic! Happy Father’s Day” tags for you to print. (Tags in download do not have my watermark on them.)

Continue reading “Father’s Day: You’re Tie-riffic! Tie Cards”

Father’s Day: I’m So Glad You’re My Pop! Boutonnieres

This week all of our Young Women met together to make Father’s Day gifts for their dads.  We had two craft projects: an “I’m so glad you’re my pop!” boutonniere and a “You’re tie-riffic!” card.  This post features the boutonnieres.  I will have a follow-up post with the cards. (For a sneak peek, scroll down to the end of this post.)

The girls loved this craft and when I came home, my six- and nine-year-olds made their own, too! These would be fun for Primary kids or Activity Days girls as well as for Young Women to make for their dads .

Continue reading “Father’s Day: I’m So Glad You’re My Pop! Boutonnieres”

As Bright As Your Faith Tags

Our wonderful Young Women’s President, Shauna, and our fabulous YW Secretary, Ashley, asked me to help them create some gifts for the Laurels in our ward who are graduating from high school.  Shauna and Ashley put together some adorable candy-filled light bulb candy jars from Hobby Lobby and wanted to attach tags with the following quote from Presiden Thomas S. Monson:

Your future is as bright as your faith.

I created some two-by-four-inch tags with the quotation in subway-art style with a bright yellow gradated background. I think they came out great and work perfectly with Shauna and Ashley’s gift. Continue reading “As Bright As Your Faith Tags”

2102 Mutual Theme CD/DVD Folders and Jewel Case Inserts

A wonderful reader of this blog requested something with my 2012 Mutual Theme logo that she  could use with a CD of special music she wanted to give to the Young Women in her Stake.  I made two options for her. Use either one to add a special touch to a music CD for a YW birthday gift, lesson handout or Young Women in Excellence favor.  Or, use them with a YW year-in-review or Girls Camp DVD!

Continue reading “2102 Mutual Theme CD/DVD Folders and Jewel Case Inserts”

More Arise and Shine Forth Fabric!

I’ve got another 2012 Mutual Theme custom fabric for you!  My Arise and Shine Forth custom fabric pillow fronts were so popular that I’ve got another Arise and Shine Forth fabric print available in my Spoonflower shop.

This time, I’ve created an all-over chandelier print featuring the 2012 theme on a pretty pink damask background.  Use this fabric to make this year memorable for all of your girls!  Why not use this fabric to:

Spoonflower fabrics are fabulous! They’re just like the printed fabrics you get at the store:  colorfast and high-quality.   Ordering is easy and they have great customer service as well.  Read my previous post on mini pillows for more Spoonflower details.

I’d love to see what you do with my fabrics!  Drop me a line–click Contact above to send me an email!


Share on Facebook
Like this on Facebook

Everyday Storyteller: Practical Ideas for Every Day Scrapbooking

It has been a while since I posted something here, but not because I haven’t been busy.  I’ve been working away on a new project: editing an inspiring new scrapbooking ebook for my friend, simplescrapper.com’s Jennifer S. Wilson.  This amazing ebook has over 30 articles written by all the top scrappers (paper AND digital) in the industry!  As I’ve been reading each submission, I’ve been SO INSPIRED to scrap again!

Check out this video trailer of the project:

Everyday Storyteller Trailer from Simple Scrapper on Vimeo.

Amazing, right?  Trust me, you’ll love all the ideas, information and inspiration in this packed idea book!

From taking amazing photographs and building mini books from memorabilia to finding time to scrap, writing journaling from the heart and working with wet media, Everyday Storyteller has everything you need to get scrapping, enjoy the scrapbooking process and try new techniques and projects.

This jam-packed eBook launches on International Scrapbook Day (May 4, 2012) and to celebrate there will be a huge launch party with fantastic prizes!  Sign up now to get all the details HERE.  And click HERE to see the list of contributors.

So, sign up now to be an Everyday Storyteller VIP!  It’s free and easy!

And, get ready to be inspired by Everyday Storyteller!

I promise to be back with more printables in the future 🙂

Photoshop/Photoshop Elements Tutorial: Customizing Photo Invitations with Text

I’ve had some questions about how to customize and add information to my photo invitations.  To help you, I’ve written this tutorial that shows you how easy this can be!  You will need to have Photoshop or Photoshop Elements to follow this tutorial, but you may also be able to adapt the steps to other software programs.  I’m going to use one of my Free Gift photo cards in this tutorial.  If you want to receive this card plus four others, Like Hang a Ribbon on the Moon on Facebook or Follow this blog by email (see right-hand sidebar).  Facebook followers can find the download link by clicking on the Welcome tab on the Facebook page.  Blog Followers will receive the link to the download via email within 48 hours of following.

Ready?  Now, let’s get started!

  • Start Photoshop or Photoshop Elements.
  • Click on File>Open and navigate to the invite .jpeg you want to add text to.  I’m going to use the temple 5×7 invite to create a Young Women in Excellence invitation.  Select the file you want and click Open.
  • Now it’s time to start adding your text.  Click on the Type tool in the toolbar. The Type tool looks like a T.

  •  The Type Tool toolbar will appear at the top of the page, just under the Menu bar.

  • To specify which font you would like to use, click on the first pull-down box on the left.  This is where you will select your font by clicking on the small down arrow and then scrolling until you find your desired font.  For this invitation, I’m going to be using two fonts:  Chocolate Box and Tagettes.  First, I select Chocolate Box from the pull-down. (Note:  If you download these fonts, you will need to unzip the files and then install them before you can use them.  You may need to restart Photoshop/PSE before the newly installed fonts appear in the pull-down.)
  •  Select the size you want your text to be in the Set Font Size box in the Type Toolbar.  It looks like a big T and little T together. There are two ways to set your font size.  You can click on the down arrow and select one of the sizes on the pull-down menu that appears OR you can click inside the box next to the number and enter a numeric value there.  For this size of project, you should not need to enter your own number.  Both the numbers and numerical values you enter refer to the point size of your type.  I am going to select 36 from the pull-down for my first lines of text in my invitation.

  • Now, move your cursor on the image roughly where you want text to appear.  Click and type.  It is a good idea to put each different line or phrase on a separate type layer.  This way, you can move them around easily without having to re-type things.  Don’t worry if your words don’t appear exactly where you want them to be–you will be able to move them around and rearrange them later. 

  • Enter all of your information.  As you enter each line of text on your invitation, a new layer in your layers palette will appear.  NOTE: if you want to put text on a black area of an invitation, be sure to change the color of your text to white (or another color) first by following the next step.

  • To change the color of your text, select the Type tool and highlight the text to be colored by double-clicking on appropriate type layer in the Layers Palette.

  • Then, click on the Select Text Color box that appears in the Type Tool toolbar.

  • This brings up the Select Text Color box.  Use the slider and reposition your cursor and click to change the color.  When you are satisfied, click OK.

  • Now it is time to arrange and finalize your text.  To make changes to a specified layer of text such as size and font, double-click on that layer in the Layers palette.  This will highlight the text to be edited.

  • Make desired changes in the Type Tool toolbar and click the check mark (Commit Any Current Edits) to accept the changes. To reject the changes, simply click on the circle with a line through it (Cancel Any Current Edits).

  • Move text layers around by using the Move tool. Double-click on the desired layer in the Layers Palette, click on the Move tool.

  • Now, move your cursor to the bounding box that appears and click.  Move your cursor inside the bounding box so it turns into an arrowhead and hold down the left mouse button while dragging the text layer to the desired position.  Release the mouse button when you’re satisfied.  Click the check mark to accept the move or the circle with the line to reject the move.

  • Once you’re done editing and arranging your text, save your file. Select File>Save from the File menu at the top.  Navigate to the desired location, RENAME your file and save.  This saves your file as a .psd file, which keeps the layers intact.  Open this file if you need to make changes later.
  • Now, SAVE YOUR FILE AS A HIGH-QUALITY JPEG FILE for printing.  Select File>Save As from the File menu.  Make sure you select jpeg from the pull down menu next to File Type when the Save As box pops up.

  • Type in your file name and navigate to where you want to save it and click save.  A dialog box will pop up that lets you set your .jpeg quality.  Drag the slider all the way to the right to the number 12–this will make sure you get the best print quality.  Click OK and it will save.  Upload the .jpeg to your photo-processing site or take it in to the store for printing.

Easy, right!  If you don’t have Photoshop or Photoshop Elements but want to give these programs a try, Adobe offers free trials–simply download the free trial, install and get going!

And, to get your started, get your free gift from me by liking Hang a Ribbon on the Moon on Facebook or by Following this blog by email (see how in the right-hand sidebar).  Find the download link by clicking Welcome on my FB page or get them by email within 48 hours of following this blog.

Thanks for visiting Hang a Ribbon on the Moon!

Share on FacebookLike this on Facebook

Activity Days: More Mom and Me Printables–Cupcake Wrappers, Treat Toppers and Flags

Here are the latest in my Activity Days: Mom&Me series of printables:  cupcake wrappers, treat-bag toppers and flags!  Use these printables, plus my other Activity Days Mom&Me invitations (photo and candy-bars) and photo frames to give your girls and their mothers a memorable time together at your next activity!  You can find the download links to my files at the end of this article.

Flags:  Make an adorable string of bunting flags using my easy-to-print .pdf file or four high-quality .jpeg files.  My flags fit perfectly on a standard 8.5-by-11-inch piece of paper or cardstock.  Print, cut and assemble!

I put together my string of bunting flags by folding the top 1/2-inch of each flag towards the back, hanging the folded flag on a length of string and then gluing down the flap.  You can also hang individual flags around the room or sew them onto a length of ribbon using a sewing machine and long, straight stitch.

Cupcake Wrappers:  Use my cupcake wrappers to dress-up cupcakes for a fun and delicious Mom&Me activity treat!

Or, have your girls make and decorate cupcakes to serve to their mothers at your Mom&Me.  Print, cut and wrap my wrappers around frosted, decorated cupcakes.  Then, secure the wrappers in back with tape or glue.

Treat Bag Toppers:  Finally, today I have some adorable Activity Days: Mom&Me treat bag toppers for you!

Designed to fit sandwich or snack-sized zip-top bags, these five-by-seven-inch (2.5-by-seven-inches when folded) treat bag toppers will help you create a playful favor for your next mother-daughter activity.  The front features my Activity Days: Mom&Me logo, the words Sweet Treats and the quote Together is a wonderful place to be!

On the back, I’ve included the Primary Theme as well as a Mom and Me barcode!  Simply print, cut, fold and secure these treat toppers with staples or double-sided tape to your own treat bags.

I hope these Activity Days printables help make your next Mom and Me get-together perfect–and EASY!  I have a few more printables coming in this series, so be sure to follow this blog or like Hang a Ribbon on the Moon on Facebook so you don’t miss a download or post.

Download my Activity Days: Mom&Me Flag files HERE.

Download my Activity Days: Mom&Me Cupcake Wrappers HERE.

Download my Activity Days: Mom&Me Treat Bag Toppers HERE.

You will need to unzip these downloads before you can use them.

Please, DO NOT SHARE MY FILES in any way!

Send your friends here to download their own copies.

Thanks so much for visiting my blog!

Share on FacebookLike this on Facebook