Yes! I’ve finished Part 2 and Part 3 of my Arise and Shine Forth 2012 calendars! You’ll find May, June, July and August in Part 2 and September, October, November and December in Part 3. I’ve created all of the months in two formats: full-page and for-binding. The for-binding calendars have an additional border to allow for binding with a Cerlox, Bind-it-All or other method. The full-page calendars are perfect for slipping into page protectors or stapling together. I’ve saved all of my calendar pages in both .jpeg and .pdf formats and they will print out beautifully in color or black-and-white.
Find Part 1 (January, February, March and April) in this post here.
Leave me a comment to let me know how you plan to use these calendars. I’d love to hear your ideas!
NOTE: All of these files are zipped and you will need to unzip them for use.
Please, remember: DO NOT to share these files with your friends (or anyone else). Simply send them to this blog to download their own. Thanks!
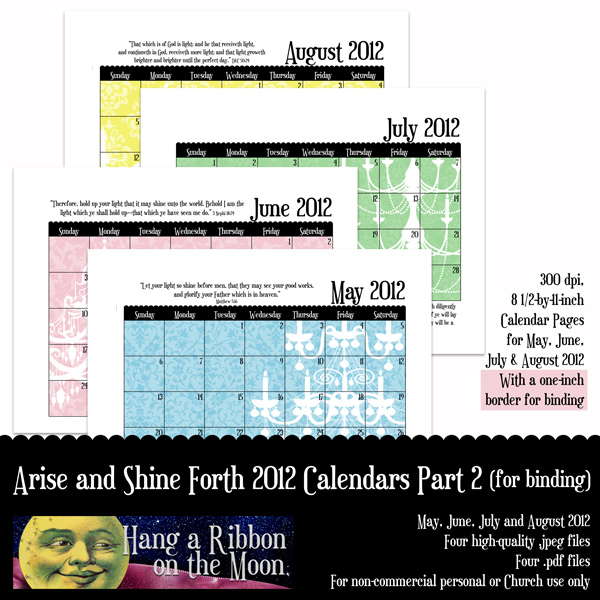
All files are for non-commercial, personal or Church use only!
Arise and Shine Forth Calendars Part 2
May, June, July and August

Arise and Shine Forth Calendars Part 2 (for binding)
May, June, July and August

Arise and Shine Forth Calendars Part 3
September, October, November and December

Arise and Shine Forth Calendars Part 3 (for binding)
September, October, November and December


Love your calendars. It is a leap year you are missing February 29.
Wow! Thanks for letting me know. I will fix February and provide a new download.
All fixed! I have updated the original downloads as well as added a post with February updated only. So sorry about this mistake. I really appreciate you for telling me, Jill! THANKS!!!
I LOVE these calendars so much! I am a YW sec. and these are PERFECT! Thanks! I was wondering…how would I edit them to add Birthdays and stuff or will that now work?
So glad you can use them! IF you want to edit them, you can do it in several ways:
1-Use Photoshop/Photoshop Elements/Gimp/In Design or other graphic-design software to open the .jpeg files and then add your activities, etc.
2-Use word-processing software to open a calendar month .jpeg file in and add your dates there. Be sure to change the margins to narrow and the paper orientation to landscape. If you’re using Word, change the margins to narrow and the orientation to landscape, and insert your calender by selecting insert>photo and browsing to where you have the calendar files on your drive. Click on the month .jpeg you want to use. It should open up on your page. Next, select insert>text box>simple text box. Edit the text in the text box that pops up and then move and re-size it to the day on the calendar you want it to go. Reduce your font size if necessary. If you want the calendar background to show through your text box, click on shape fill>no fill in the text box tool bar. To remove the border, select shape outline>no outline in the text box tool bar. You should be able to add as many text boxes as you need per calendar page.
3- Go old school and just write in the info you need or use a typewriter 🙂
I hope this helps!